
OpenLDAP Pass-through 구성 본문
반응형
Pass-through OpenLDAP Authentication (Using SASL) to Active Directory on Centos
통과 인증은 다른 백엔드에 인증 작업(BIND)을 위임하기 위해 일부 LDAP 디렉토리에서 사용하는 메커니즘
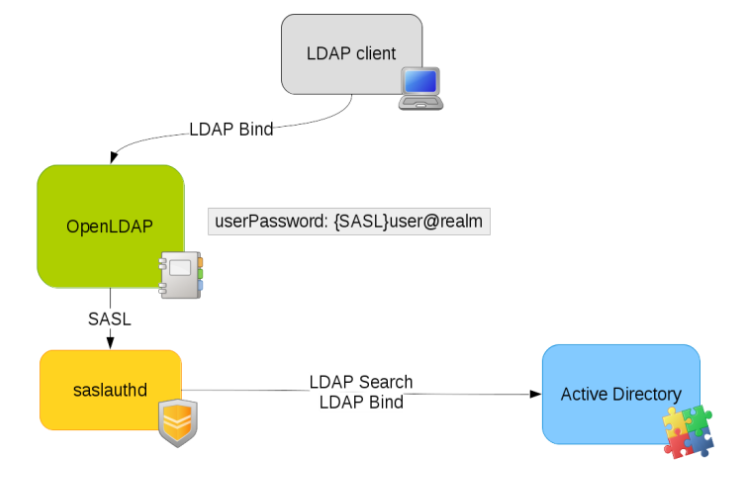
※ SASL(Simple Authentication and Security Layer)은 인터넷 프로토콜에서 인증과 데이터보안을 위한 프레임워크이다. 이것은 애플리케이션 프로토콜들로 부터 인증 메커니즘을 분리시킨다.
1단계: 백엔드 연결
- Server address: ldap://{HOSTNAME} (or) ldap://{IP}
- Bind DN: {CN}
- Bind Password: {PASSWORD}
- Users branch: {OU}
- 연결확인
ldapsearch -x -LLL -H ldap://{IP} -D "{CN}" -w "{PASSWORD}" -b "{OU}"2단계: LDAP 액세스 매개변수 정의
/etc/saslauthd.conf에 아래 항목을 추가
ldap_servers: ldap://{IP}
ldap_search_base: {OU}
ldap_timeout: 10
ldap_filter: sAMAccountName=%U
ldap_bind_dn: {CN}
ldap_password: {PASSWORD}
ldap_deref: never
ldap_restart: yes
ldap_scope: sub
ldap_use_sasl: no
ldap_start_tls: no
ldap_version: 3
ldap_auth_method: bind
3단계: SASLAUTHD 설정
cyrus SASL 데몬 및 해당 LDAP 플러그인을 설치
yum install cyrus-sasl
cyrus-sasl-ldap
SASL 데몬이 LDAP를 지원하는지 확인하십시오.
saslauthd -v

[OUTPUT]
saslauthd 2.1.26
authentication mechanisms: getpwent kerberos5 pam rimap shadow ldap httpform
4단계: LDAP를 SASL 메커니즘으로 활성화
/etc/sysconfig/saslauthd 파일을 편집
SOCKETDIR=/var/run/saslauthd
MECH=ldap
FLAGS="-O /etc/saslauthd.conf"
saslauthd 시작
chkconfig saslauthd on
service saslauthd restart5단계: OPENLDAP와 SASLAUTHD 간의 통신 구성
SASL 데몬에 연결하는 방법을 OpenLDAP에 지시하도록 /usr/lib64/sasl2/slapd.conf 파일을 업데이트
pwcheck_method: saslauthd
saslauthd_path: /var/run/saslauthd/mux
6단계: OPENLDAP 사용자를 SASL 그룹에 추가(배포 설정에 이름 조정):
usermod -a -G saslauth LDAP7단계: OPENLDAP 구성
OpenLDAP 구성 파일 /etc/openldap/slapd.conf를 편집/추가하여 SASL 매개변수를 구성합니다.
sasl-host       localhost
sasl-secprops   none
OpenLDAP 다시 시작:
service slapd restart8단계: SASL 인증 테스트:
다음 명령을 사용하여 SASL 부분을 테스트할 수 있습니다.
testsaslauthd -u DN -p Password9단계: OPENLDAP에서 계정 생성:
새 사용자 생성을 위한 ldif 파일 생성: userpassword에 AD 메일계정 입력
n: {CN}
cn: {CN}
gidnumber: {}
homedirectory: {}
loginshell: /bin/bash
objectclass: inetOrgPerson
objectclass: posixAccount
objectclass: top
sn: {}
uid: {}
uidnumber: {}
userpassword: {SASL}{EMAIL}
위의 파일과 함께 ldapadd 명령을 사용하여 OpenLDAP 디렉터리에 새 사용자를 만듭니다.
ldapadd -x -W -D "{CN}" -f test.ldif10단계: Active Directory 자격 증명을 사용하여 로그인 확인
참고) Pass-through OpenLDAP Authentication (Using SASL) to Active Directory on Centos
'Linux Server' 카테고리의 다른 글
| [Centos] 런덱 설치 스크립트 (0) | 2022.01.21 |
|---|---|
| Gitlab self-managed Edition 변경 (CE -> EE) (0) | 2022.01.10 |
| openJDK 수동설치 (0) | 2021.12.13 |
| Maven 수동설치 (0) | 2021.12.13 |
| OpenLDAP+PHPLdapAdmin+LDAP 비밀번호 변경서버 설치 (0) | 2021.07.28 |
'Linux Server' 관련글
더보기

Comments